VS Code and RAW
To enable the best development and test experience, RAW has made use of Microsoft Visual Studio Code. The key features of this IDE are its popularity, ease of use, integration with Git, and a powerful extension mechanism that allows custom functionality.
RAW provides an extension for VS Code, which is available from the VS Code Marketplace.
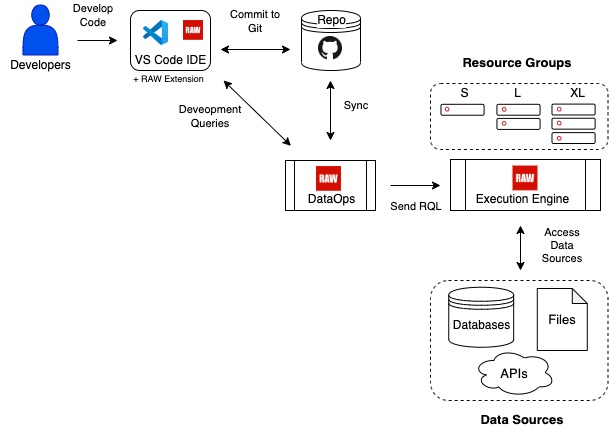
RAW Developer Interaction Diagram
As a Developer using VS Code and our RAW Extension, you have a single interface to interact with GitHub and our RAW DataOps platform.
- Write queries
- Test endpoints
- Branch and merge
Visual Studio Code Extension
Introduction
Visual Studio Code is an extensible and widely used general purpose text editor. RAW Labs VS Code Extension provides a way to test your code and publish it so the final result is delivered to APIs consumers.

The extension will guide you through the bellow process.
In order to test your code you have to:
- Login to RAW from your VS Code.
- Open a GitHub repository folder as root directory in VS Code
- This repository should exist on GitHub (not only locally)
- RAW Labs should be authorized to read your repository so you have to install our GitHub reader to your repository.
The Basics
Installation
In order to install the extension search raw in the VS Code marketplace and click on install.

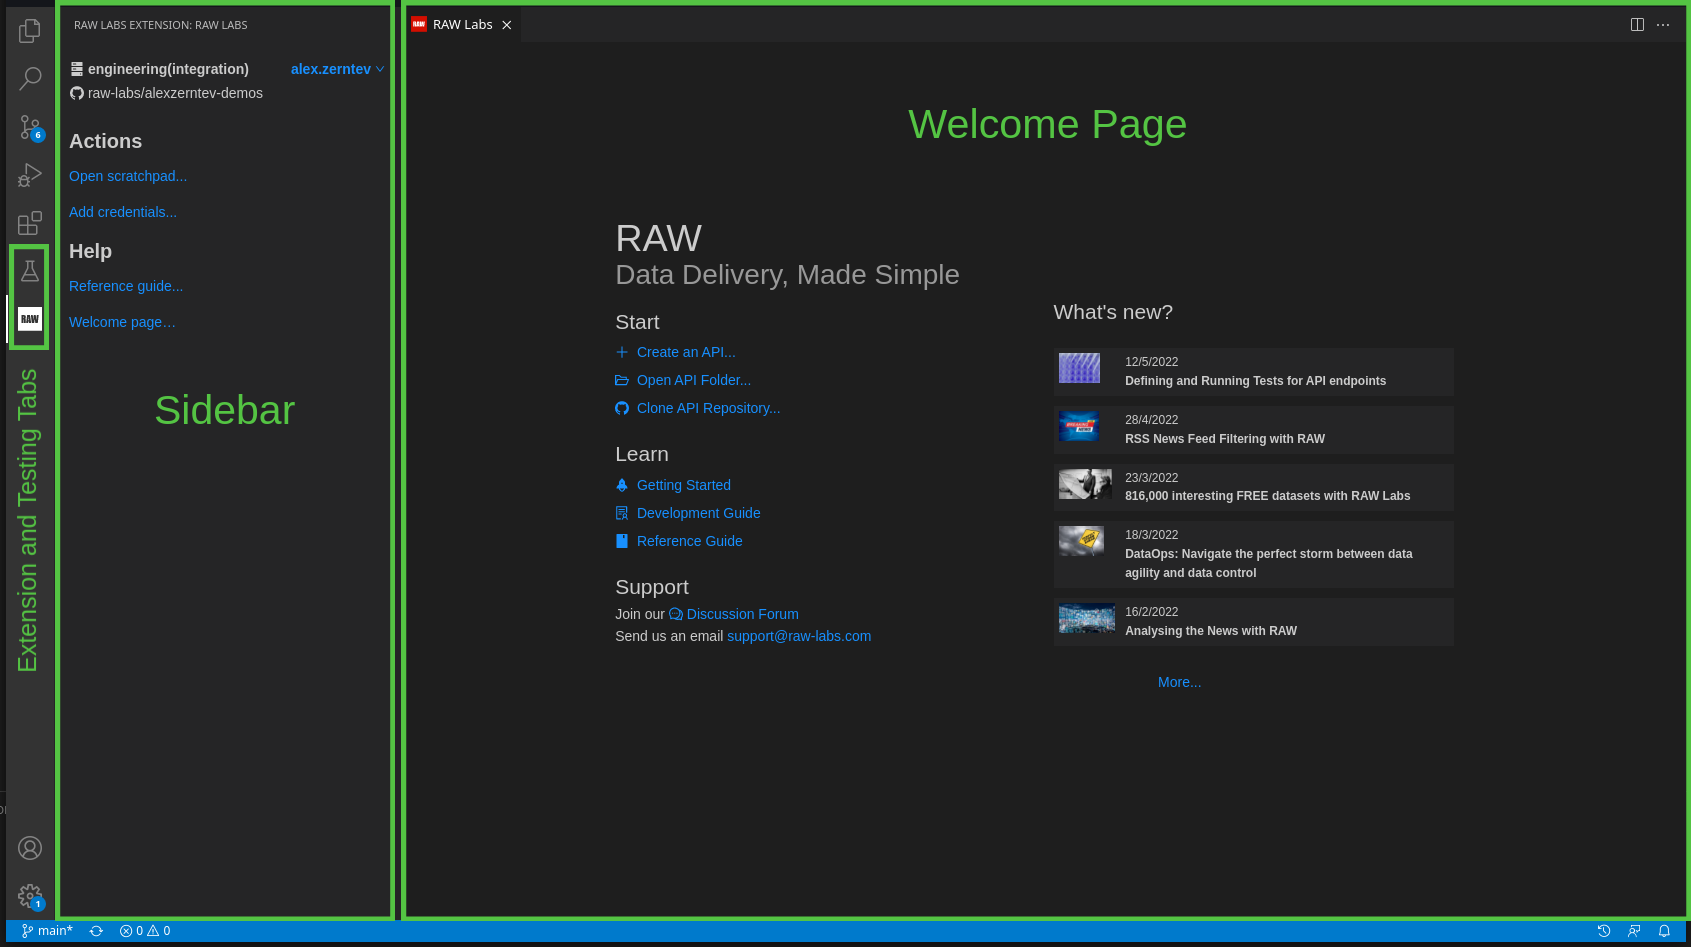
Layout
- Extension and testing tabs.
- On clicking on Extension tab, RAW Labs VS Code extension is activated and displayed.
- On clicking on Testing tab, a unit test for APIs will be activated
- Welcoming Page. An introductory tab that contains learning recourses, starting actions, support links and the latest news.
- Sidebar. The Sidebar contains the current state of the environment and guides the user to set it up correctly. When the environment is set it contains the basic set of functionalities.
When Logged In and Environment is set
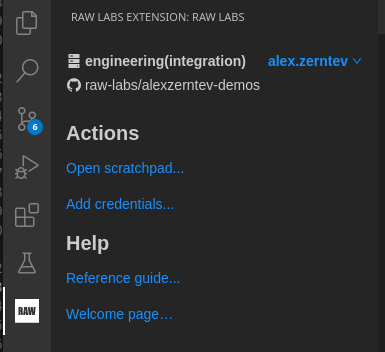
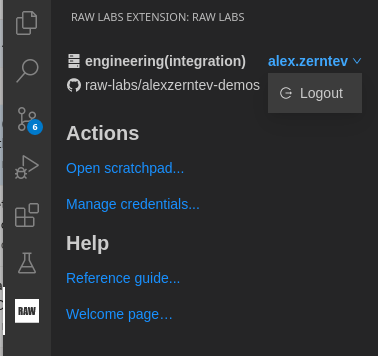
- You installation name and your username are shown here. If you use multiple environments it is shown in a formant : installation-name (environment)
- The current repository that you are working on. It is clickable and redirects you to the github page of the repo when clicked.
- Open Scratchpad opens the scratchpad (a testing editor) where you can try out your queries before creating an API
- Manage Credentials opens RAW Labs web app when credentials can be added.
- Reference guide a link to this page.
- Welcome page opens the Get Started view.
Get Started Tab
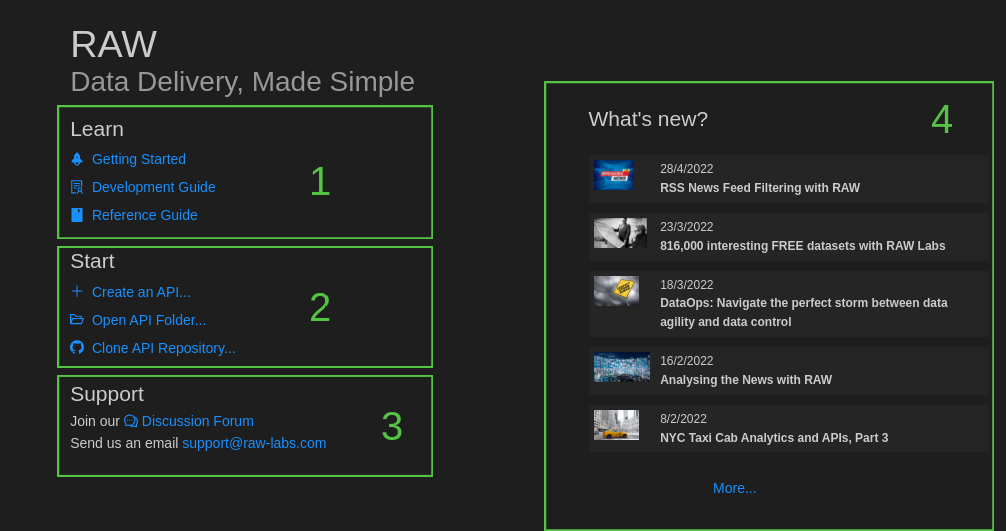
- Learning section. Here you can find learning recourses such as Getting Started Guide, Development Guide and Reference Guide.
- Starting section. Here you can create a new API from template, Open an existing one or clone one from GitHub.
- Support section.
- News section
Authentication
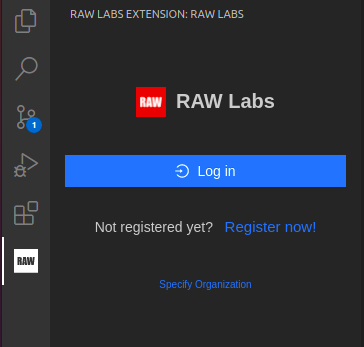
In order to be able to run queries you firstly have to Login. Without logging in you won't be able to execute queries. The authentication is needed so only you can access your Data. Security is a great concern for us.
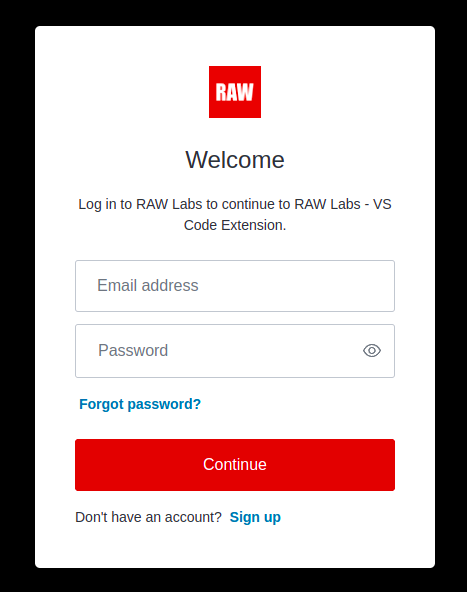
Login
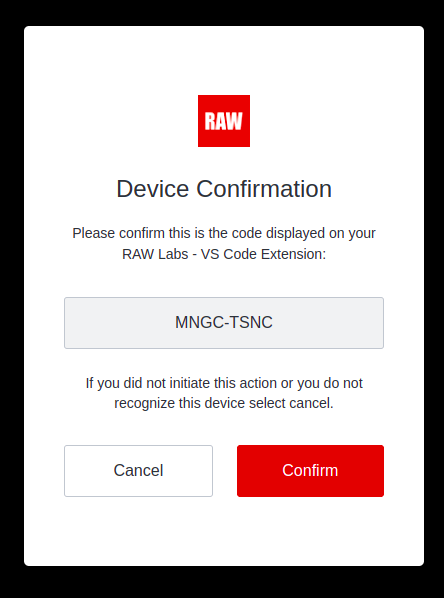
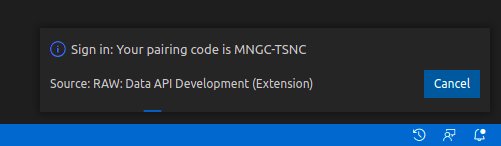
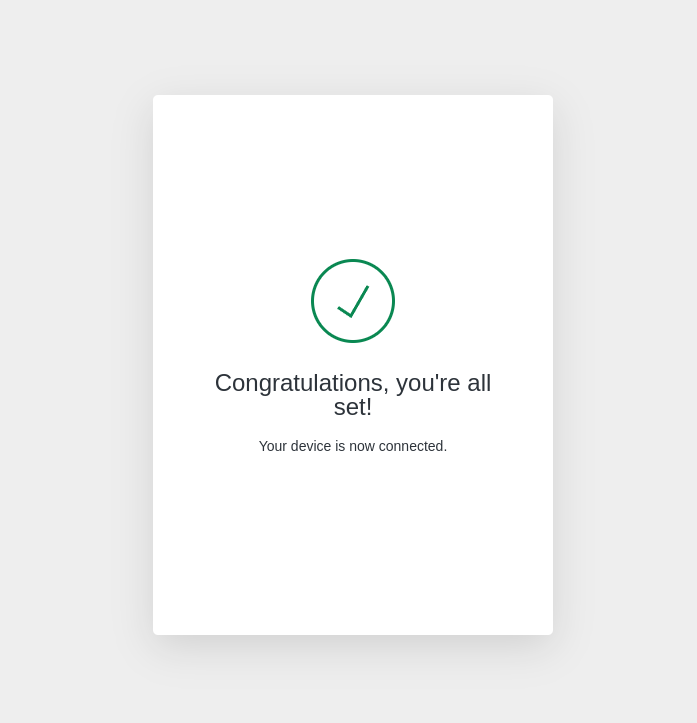
Then press Login, the below window opens in browser and a loading bar emerges in VS Code. Please cross check the two codes to be the same before confirmation. If they are, press confirm.
 |  |
|---|
Then provide your credentials from RAW Labs.
 |  |
|---|
Logout
Creating new API
Assuming that you have Git installed, and already logged in. In order to create an API you need to follow 3 simple steps.
Select the template

Press the Create an API button and select the directory to where you would like your template to be extracted.
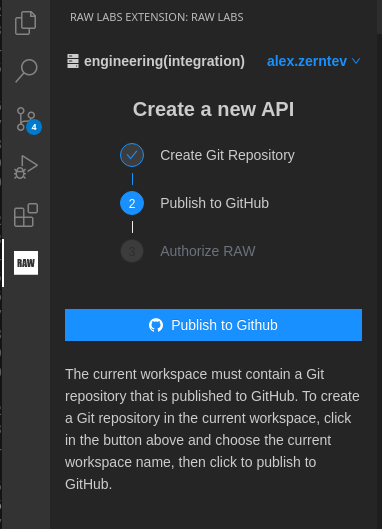
Publish the generated template to GitHub
At this point, if you are not authenticated to GitHub, VS Code might ask for permission to connect to GitHub.
You can just press the Enter key sequentially in order to speed up the process.
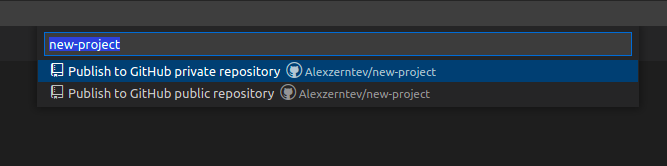
Press the Create Git Repository button, then select the directory that you use.
Then select the visibility of the new repository and the files that you would like to push to the repo.
 |  |
|---|
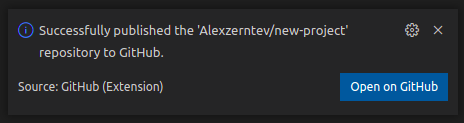
When the repo is published you will see an indication in the right bottom corner.
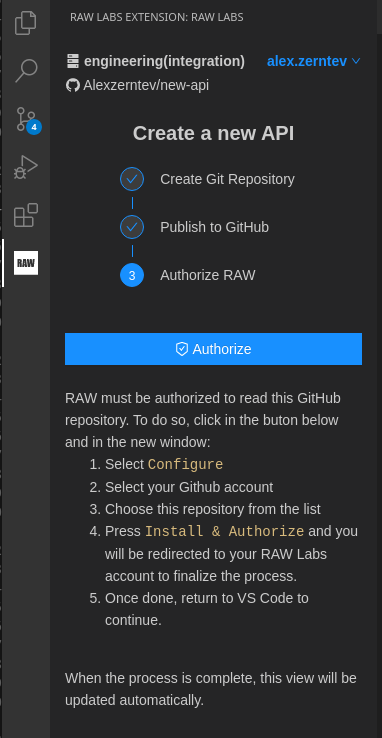
Finally authorize RAW Labs to read the repository
Click on the Authorize button and follow the Installing GitHub Reader guide. This view will refresh automatically when the reader is installed.
Ready to use
Your API is ready, Cheers! 🥳
Editing Code
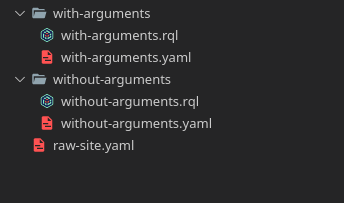
Every endpoint consists of two parts: the YAML file and the Snapi code.
The yaml file is the settings of your endpoint. The Snapi file is the code that generates the data for the endpoint.

The overall structure should also contain a raw-site.yaml which is global setting for your endpoints. So finally you repo in the file system should look like the image below.
 |  |
|---|
Snapi
Scratchpad
Scratchpad is a "Playground" for testing Snapi code and queries without any need of yaml settings. In order to use scratchpad you still have to login and open a repository that is published to RAW Labs.
Opening
In order to open scratchpad go to RAW extension panel tab and press the below button
For more advanced VS Code users there is also a command by pressing ctl + shift + p and type open scratchpad.

Running Code
In order to run the code there are 3 ways.
- Right click -> RAW - Run Scratchpad Code
F8when focused on the scratchpad
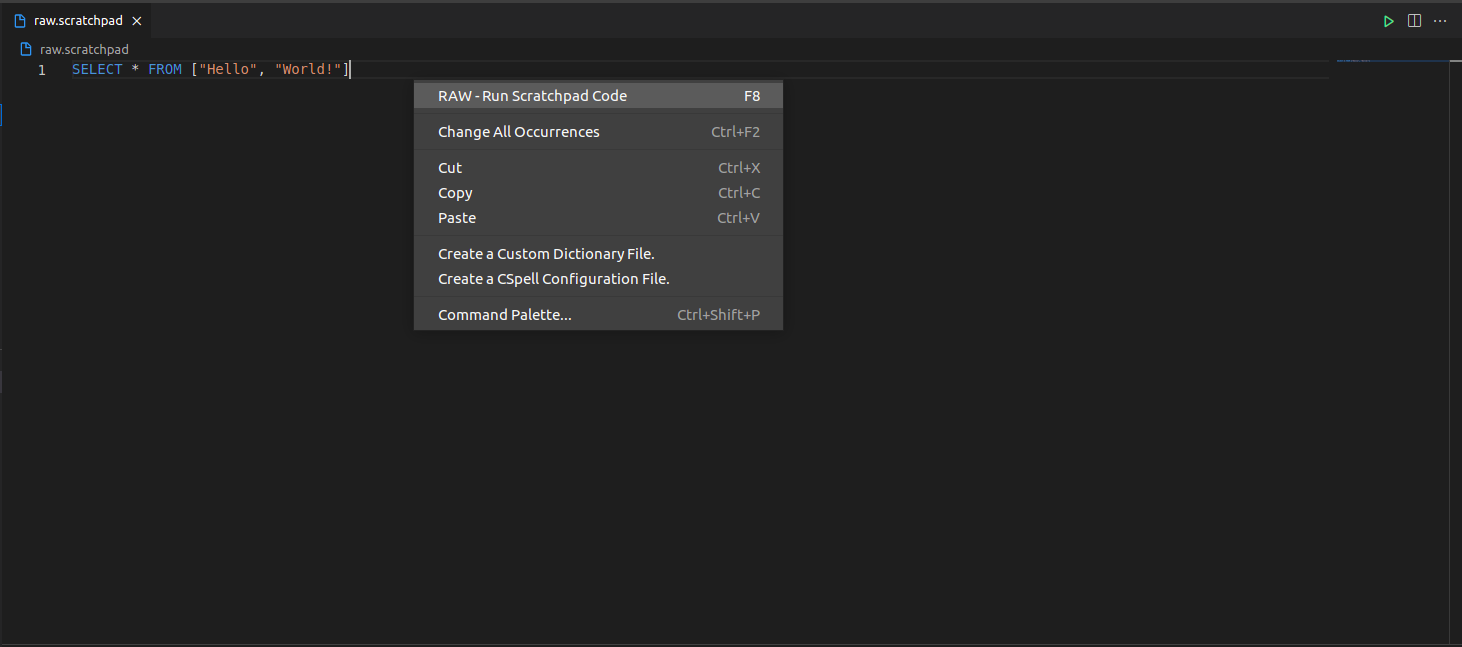
- By pressing the Play button when focused on the scratchpad
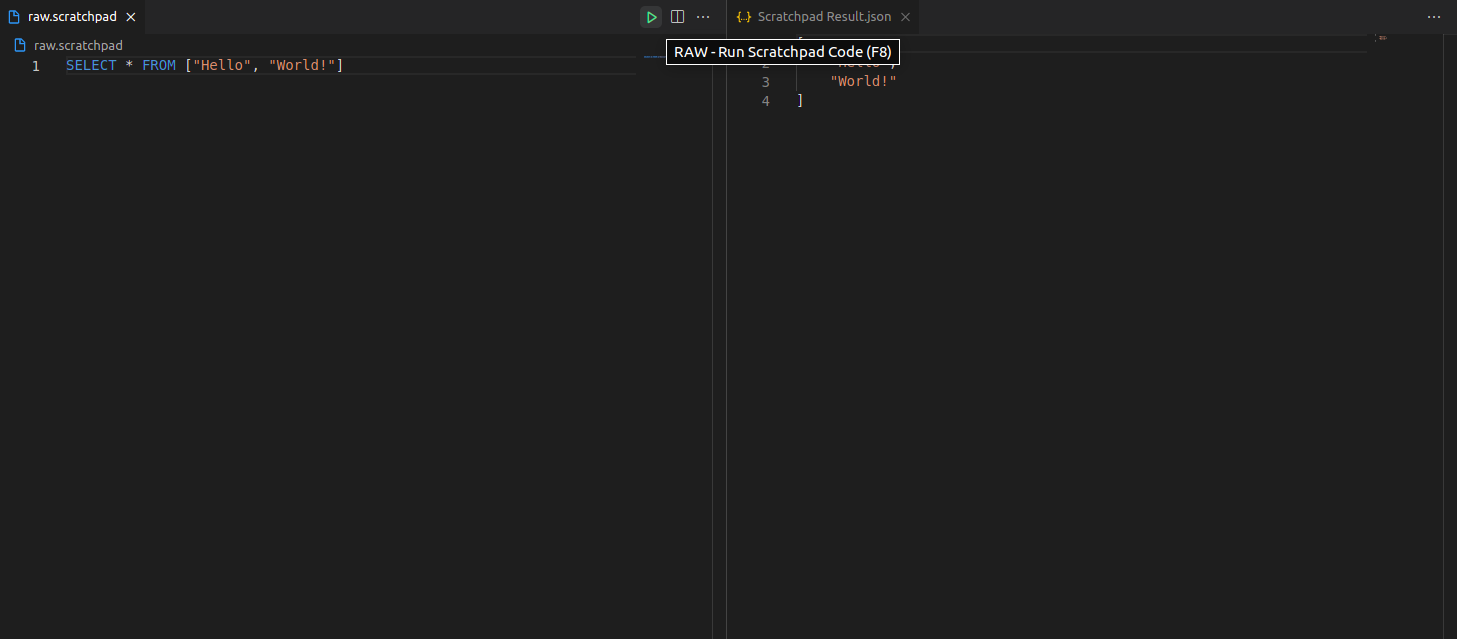
The result of your query will be visualized in a new tab.
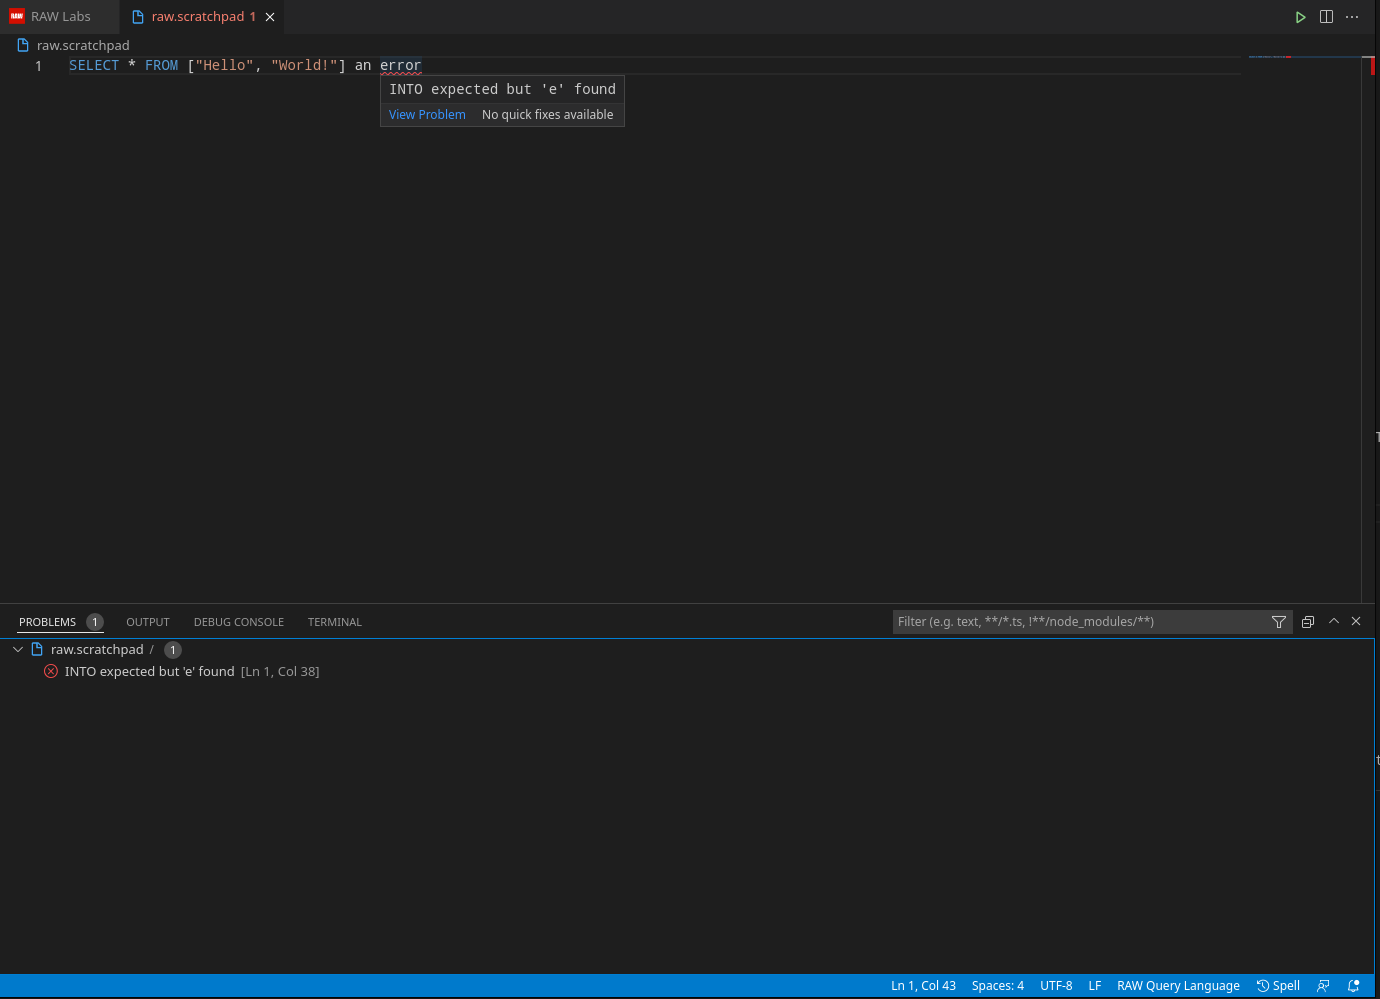
Snapi validation
Snapi validation happens after running the related yaml file or scratchpad code. The errors will be visualized in the problem section as well as underlined inside the file.
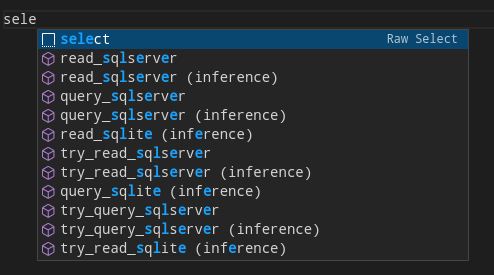
Invoking Snapi Autocompletion
While editing Snapi files press trigger suggestion (ctrl + space default on windows and linux, To find out the keybinding on your computer go to File -> Preferences -> Keyboard Shortcuts -> Trigger Suggest" keybinding), a list will emerge with the available options.
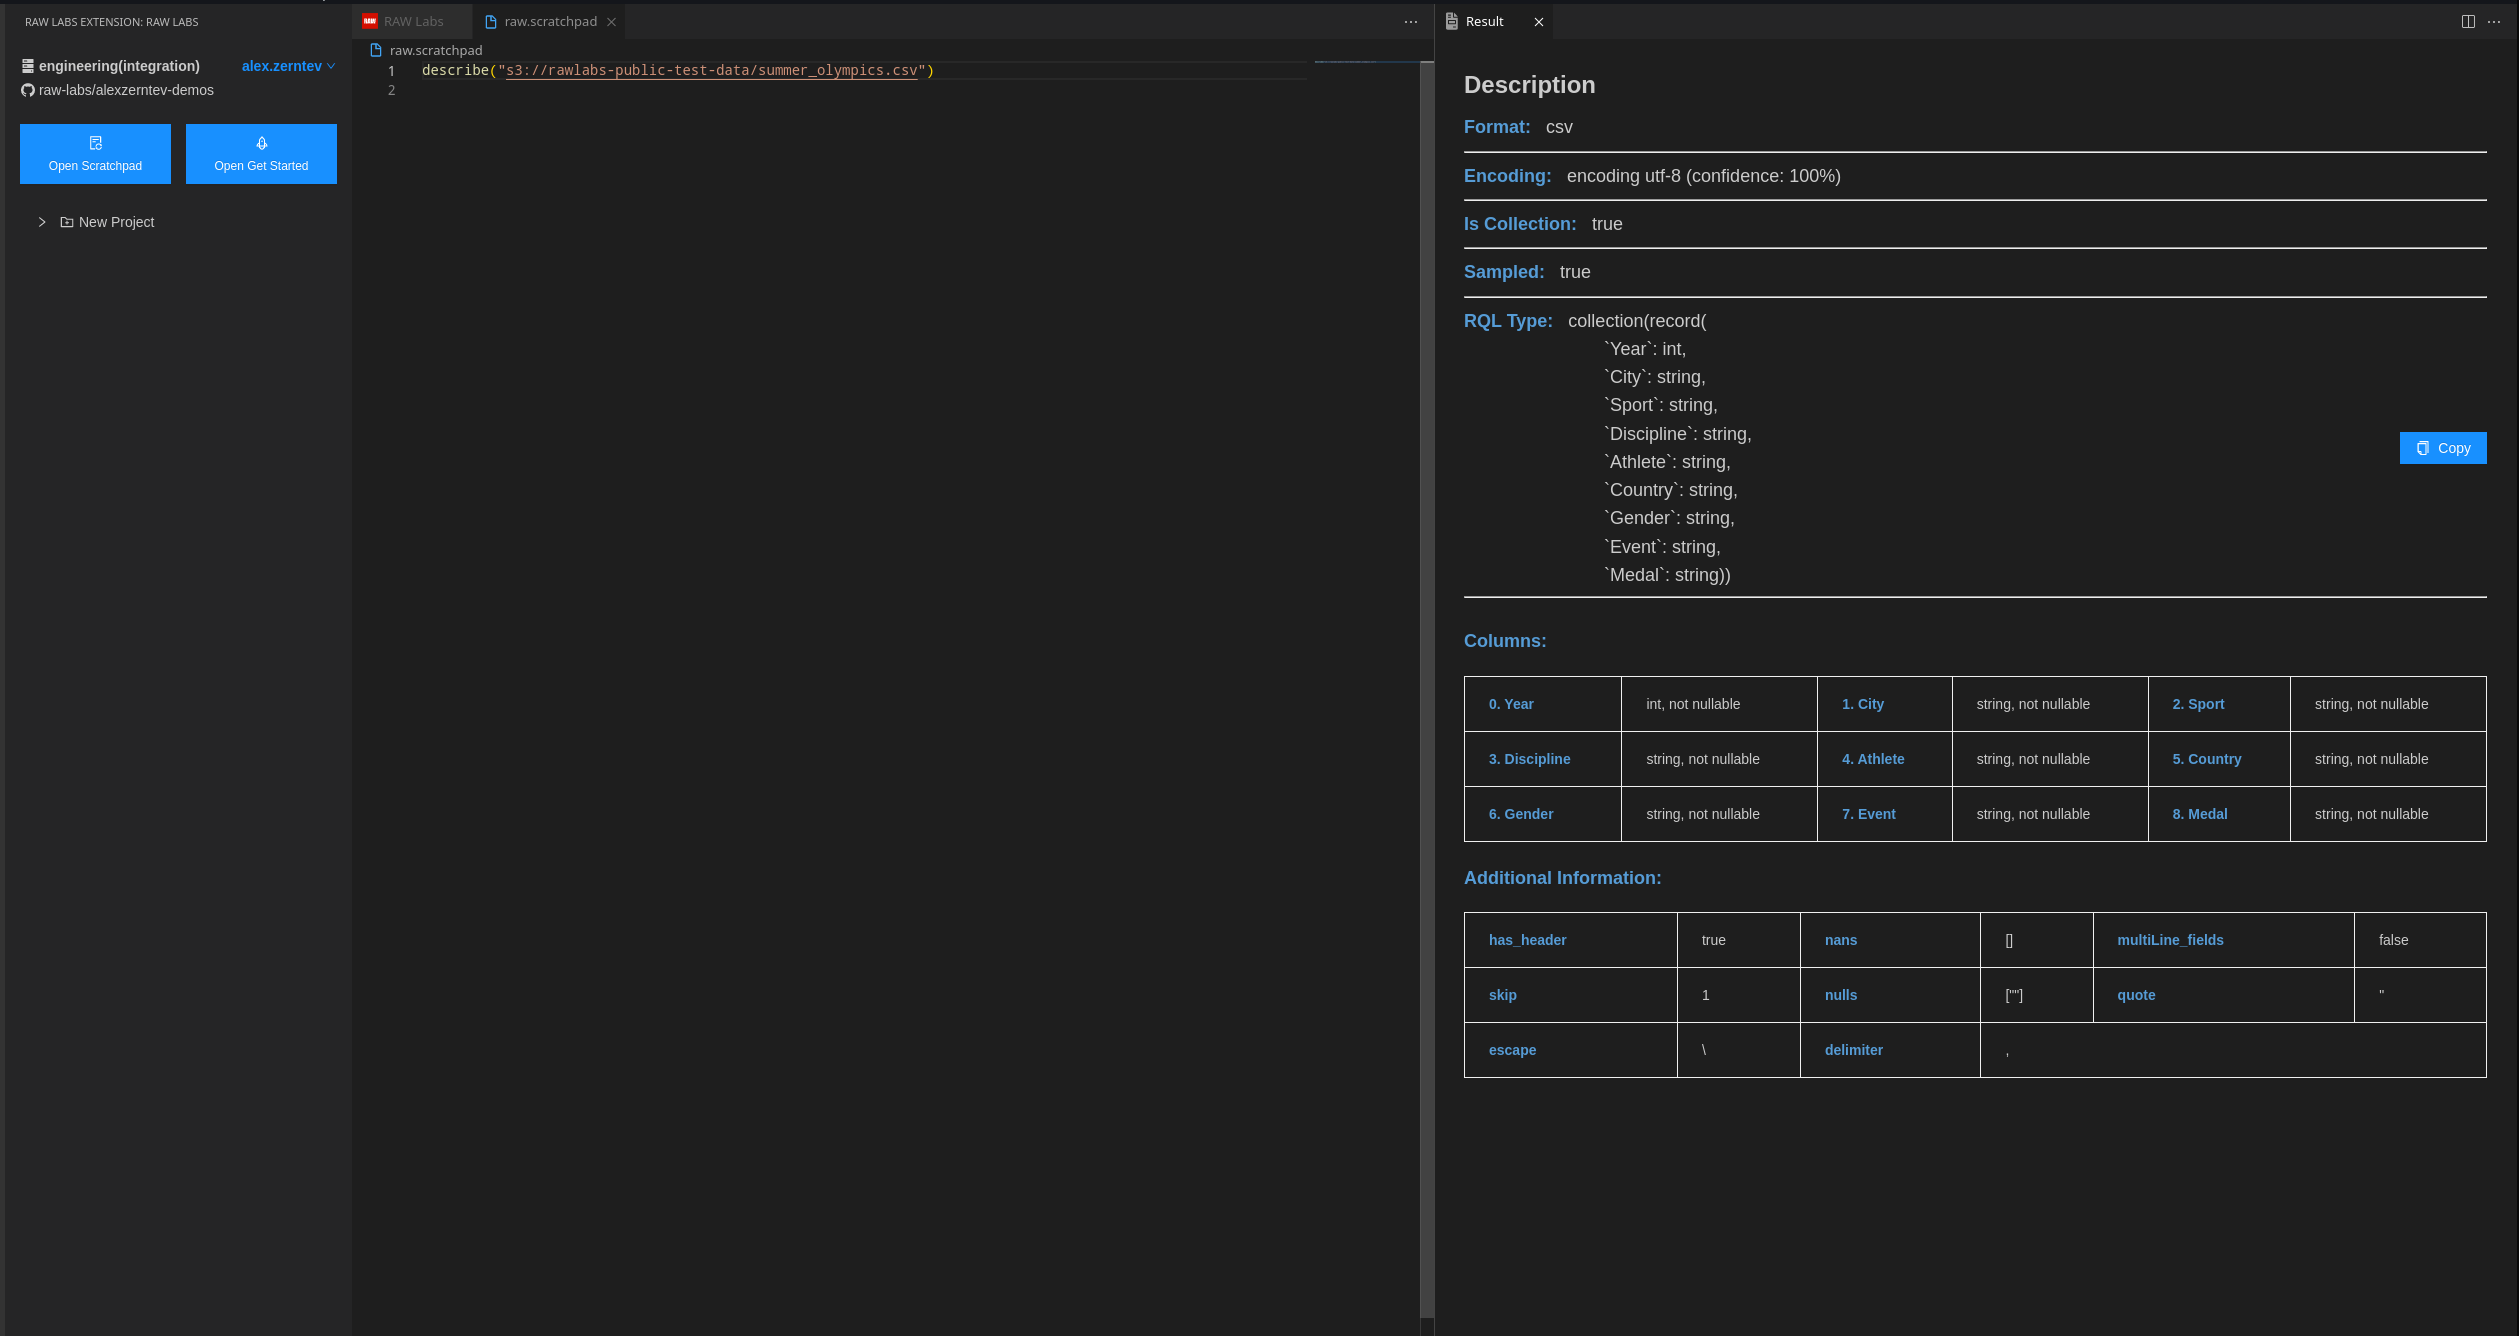
Describe The Data
You can visualize the data format from data sources by ctrl + left click (or by running the Describe("location")) function in Scratchpad
Documentation on hover
When hovering Snapi specific functions and keywords, their documentation is shown.
Commenting code
By selecting code and pressing ctrl + / the comment - uncomment is triggered.
YAML
Invoking YAML Autocompletion
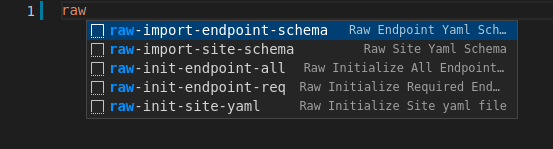
While editing YAML files press trigger suggestion (ctrl + space default on windows and linux, To find out the keybinding on your computer go to File -> Preferences -> Keyboard Shortcuts -> Trigger Suggest" keybinding), a list will emerge with the available options. Every raw snippet starts with raw
Schema
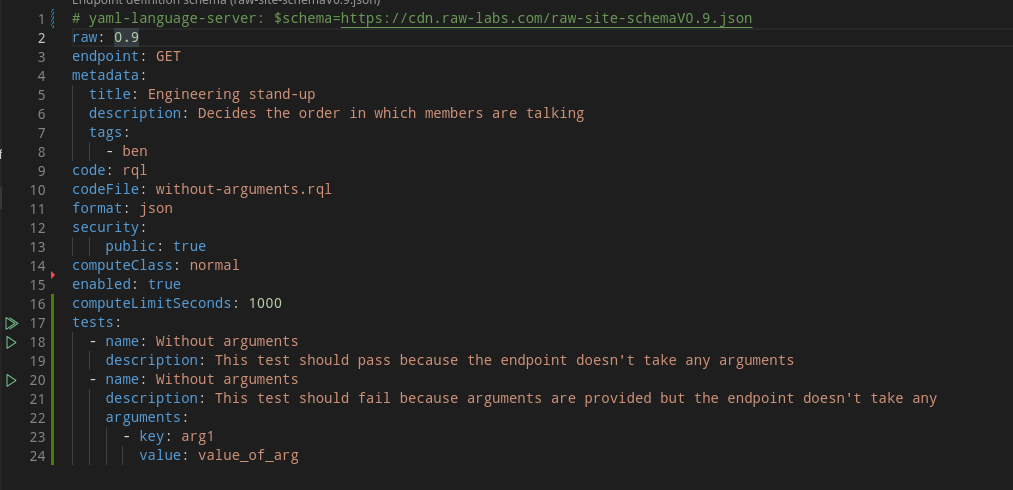
Your YAML autocompletion and validation is done by importing the schema. There are two types of schemas: Site Schema and Endpoint Schema. Depending on which file you are editing, select the correspondent one. The below line of code will emerge. This enforces the restrictions on the file you are editing.
#yaml-language-server: $schema=https://cdn.raw-labs.com/raw-site-schemaV0.9.json
Pre-completion
Some of yaml fields are optional and some are required. You can pre-generate them by selecting one of the below in autocompletion:
raw-init-endpoint-reqfor only required fieldsraw-init-endpoint-allfor all the fieldsraw-init-site-yamlfor all the fields
Testing the Endpoints
RAW Labs VS Code extension supports unit testing for APIs.
Define Your Tests
In an endpoint yaml file you can define your tests.
...
The Rest Of The Yaml File
...

tests: # <------ TESTS ARE DEFINED HERE
  - name: ATest without arguments # Required
    description: a simple test without arguments
  - name: ATest with arguments # Required
    description: a simple test with arguments
    arguments:
      - key: arg1
        value: value_of_arg
There are two categories of tests: tests without arguments (the first test above) and tests with arguments (the second test above).
Tests without arguments
This test are for endpoints that don't take query parameters. e.g https://your-installation/endpoint
Tests with arguments
This test are for endpoints that take query parameters. e.g https://your-installation/endpoint?arg1=value_of_arg
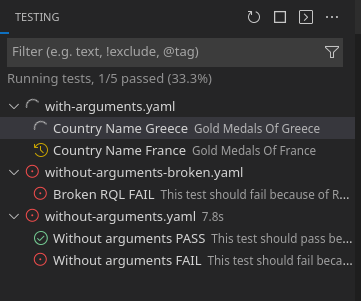
Running tests
There are several ways of running the defined tests.
Running tests form inside the file
When the tests are defined play buttons emerge. The double play button runs all tests in the file. The single runs the specific test.
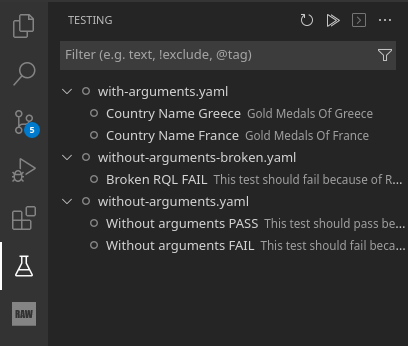
Testing Tab
When focusing on the testing tab, all the existing tests defined inside the workspace are shown per file (regardless the nesting of directories). You can either run all of them by pressing the "double play" button on top, or run them one by one.
Every test has a state:
- Grey - the test hasn't run yet
- Orange - the test is in queue
- Green - the test passed
- Red - the test failed because of an error
 |  |
|---|
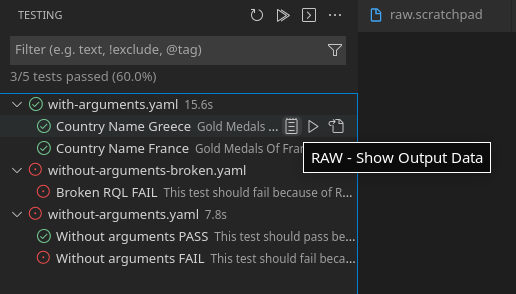
Showing endpoint output
By clicking the below icon, you can see the Data result of the test.
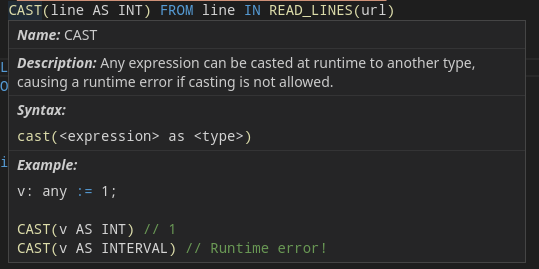
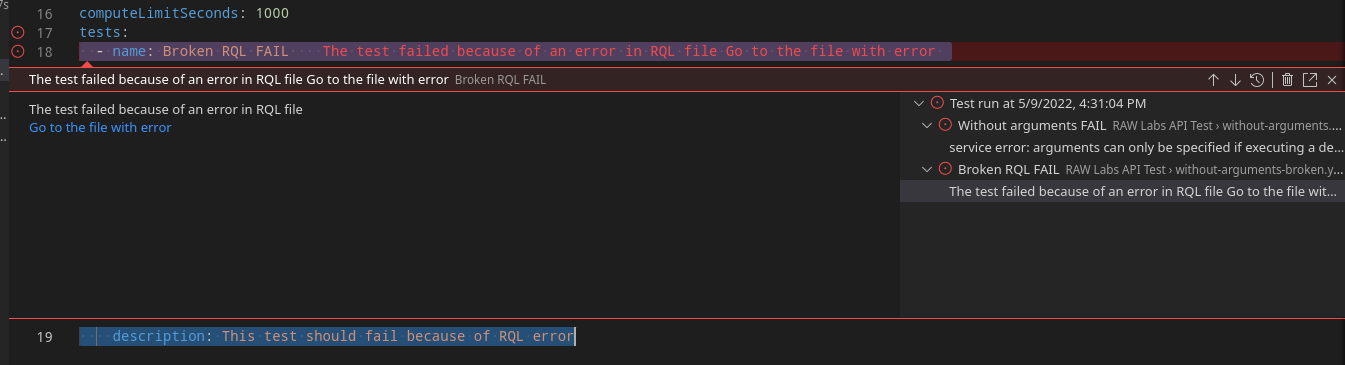
Reading the test failures
A test can fail with two types of errors:
- Runtime Error
- Execution Error
Runtime errors can be visualized by opening the correspondent error:

Execution errors can be visualized by opening the correspondent error. There is a link inside pointing to the brocken code file :
Publishing Endpoints
When you are finished creating your API. Just commit and push your repository. They will be published - updated automatically.
Environment States
RAW Labs VS Code extension interacts dynamically with the users environment. At each point it is aware of the environment state and suggests next steps to the user.
Git Not Installed
If you don't have Git installed on your machine, you will see the below state. In this case you will have to Install Git. And press the Reload button when the installation is finished.

Email or Username are not defined in Git
In order to use Git you firstly have to define you username and email (If you don't, Git will complain and suggest you do the next steps described here). The reason for that is that the Git technology can also be local only so if you do a commit, it has to attach a name to it. To do that please run the two below commands in your terminal. Press the Refresh this view button when you finish.
git config --global user.name "your-user-name"git config --global user.email "your-user-email"
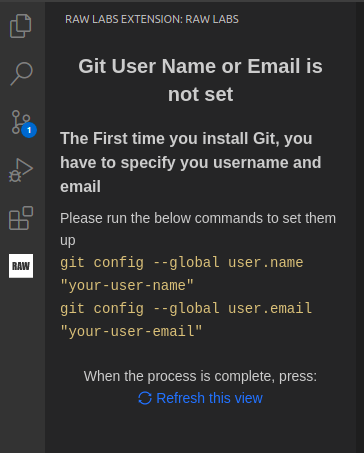
The above two steps need to be done only once. When they are done, you always will start from the next states.
User not authenticated
In order to use the RAW Labs VS Code extension, you have to login first. If you haven't registered yet, press the Register now! button to create an account. To login please follow the steps of Login section.
No raw-site.yaml in the workspace
Every RAW Labs GitHub repository has to include a raw-site.yaml file. Without it, a repository is considered not valid. Here you can either manually create a raw-site.yaml file in the root directory, or use a Template.
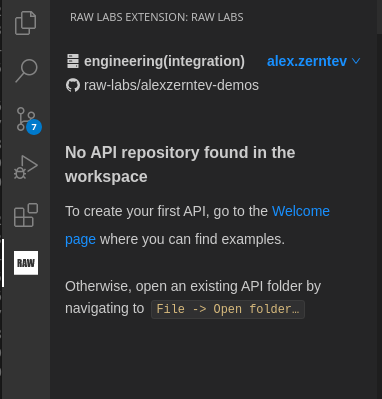
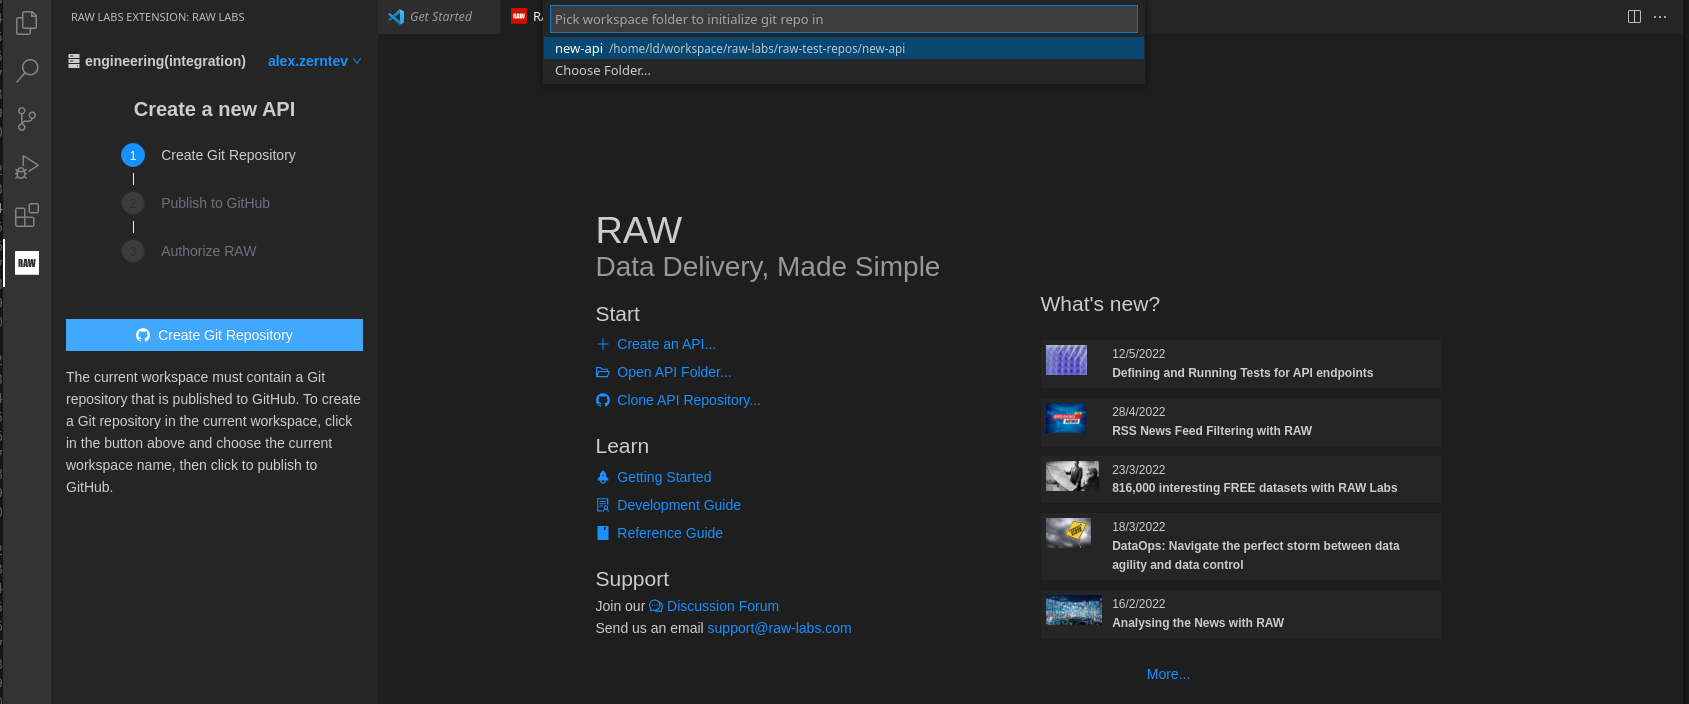
No Git repo in the workspace
In order to use RAW Labs VS Code extension, you have to open a workspace that contains a GitHub repository. If the opened folder doesn't contain one you will see the below screen. It suggest you to initialize a local GitHub repository and directly publishing it.
Git Origin is not set
If your workspace (root) folder contains a git repository but its origin (remote) is not set you will see the below screen. You have two options here: either to publish the repo to GitHub and set the origin to newly created (remote) repo. Or if the repo already exists on GitHub just select it as origin of your local repo.
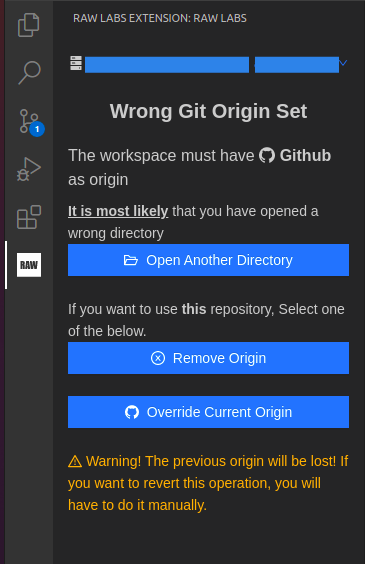
Wrong Git Origin is set
If your current workspace contains a repository that is not a GitHub repository, probably you opened it by mistake so the extension suggests for you to open a correct workspace. In a rare case where you have your RAW Labs repository on some other Git provider (other than GitHub), the extension suggests to either to remove the wrong origin, or to override it.
RAW Labs in not authorized to read your GitHub Repository
RAW Labs Platform needs to be authorized in order to have access to your repository. Please follow the Installing GitHub Reader guide.
Environment is Ready
If your repository is ready to use, you will see the below screen. Cheers! 🥳
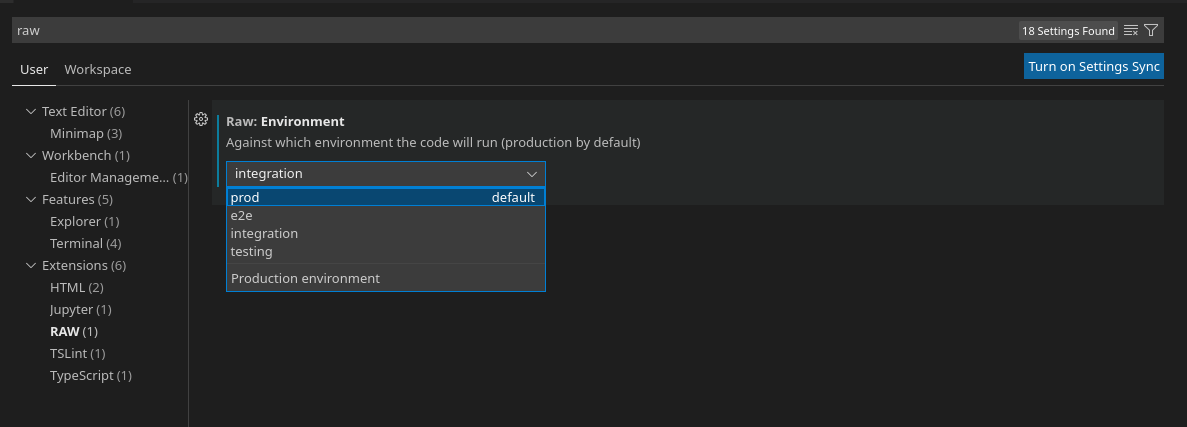
Extension Settings
Please ignore this topic if you don't use multiple environments
Environment Setting
The default set environment is production, if you want to run the code against other environment, please change it in File -> Preferences -> Settings by searching RAW setting.